

Nothing beats a perfectly cooked steak—one that’s juicy, tender, and has that irresistible, crispy crust. But if you’ve ever struggled with uneven doneness, a dry center, or an overcooked exterior, it’s time to meet your new best friend: the reverse sear method.
This cooking technique flips the traditional steak-searing process upside down, giving you unparalleled control over doneness and an ultra-flavorful crust. Whether you’re cooking for a special occasion or just treating yourself, mastering the reverse sear steak technique will change your steak game forever. 🔥
Table of Contents
What is Reverse Sear Steak?
The Science Behind Reverse Searing
Reverse searing is a two-step process that involves slow-cooking the steak first and then searing it at the end to develop that mouthwatering crust.
Here’s why it works:
✔ Slow cooking ensures even doneness – No more overcooked edges and undercooked centers.
✔ Searing at the end locks in the perfect crust – That rich, golden-brown Maillard reaction intensifies the flavor.
✔ Resting is built-in – The steak gradually comes to temperature, meaning less juice loss.
Unlike the traditional method—where you sear first and then finish cooking—the reverse sear method gives you way more control over the final texture and doneness.
How is Reverse Sear Different from Traditional Searing?
| Feature | Traditional Searing | Reverse Searing |
|---|---|---|
| Cooking Order | Sear first, then cook | Cook first, then sear |
| Temperature Control | High heat from the start | Low heat, then high |
| Doneness Control | Risk of overcooking | Even edge-to-edge cooking |
| Best for | Thin steaks | Thick steaks (1.5″ or more) |
| Flavor Intensity | Good, but crust might burn | Stronger, well-developed crust |
So, if you love a crispy crust and perfectly even doneness, reverse searing is your golden ticket to steak perfection.
Why Choose the Reverse Sear Method?
If you’re wondering, “Is reverse searing really worth the hype?”—the answer is YES! Here’s why:
1. Perfect Edge-to-Edge Doneness
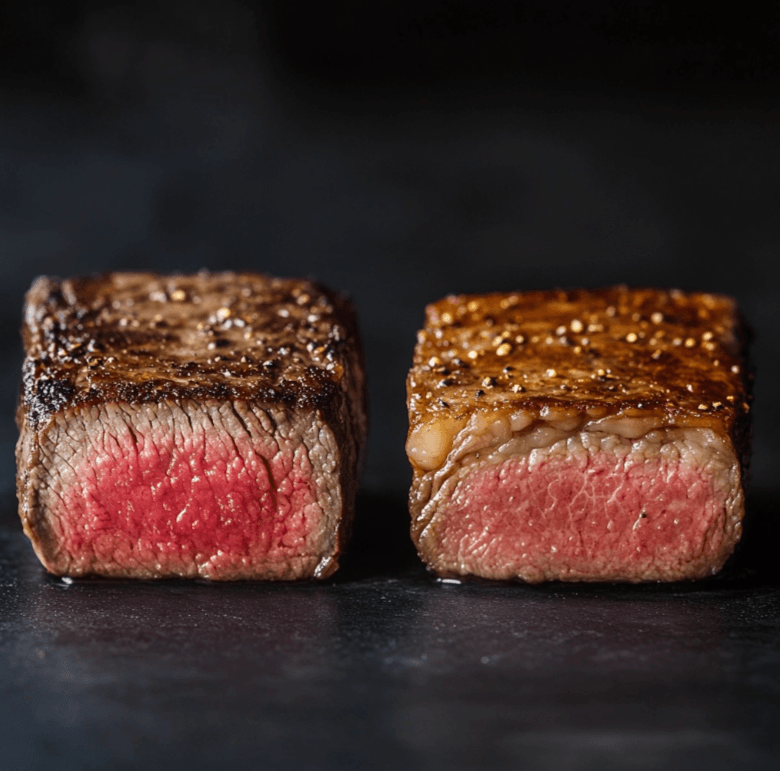
Ever cut into a steak only to find the center raw and the edges well-done? That’s what happens with high-heat searing. Reverse searing, on the other hand, lets the steak cook slowly and evenly, giving you a uniform pink center from edge to edge.
2. A Next-Level Crust
The Maillard reaction (the science behind that delicious golden-brown crust) happens best in a dry environment. By slowly bringing the steak up to temperature first, you dry out the exterior, making it crisp up beautifully when seared.
3. More Control Over Cooking Temperature
With reverse searing, there’s no guesswork—you can monitor the steak’s internal temperature and pull it exactly when it’s ready, preventing overcooking.
4. Juicier and More Tender Reverse Sear Steak
Since the steak gradually warms up, the muscle fibers don’t tense up as much as they would under direct heat. That means less juice loss and a more tender, succulent bite.
So, if you want steakhouse-quality results at home, reverse searing is your go-to method.
Best Cuts of Reverse Sear Steak
Not all steaks are created equal—some cuts work better for reverse searing than others. The key? Thickness.
✅ Best Cuts for Reverse Sear
✔ Ribeye – Fatty, flavorful, and one of the best choices for reverse searing.
✔ Filet Mignon – Super tender, lean, and benefits from controlled cooking.
✔ New York Strip – A balanced cut with good marbling.
✔ Tomahawk Reverse Sear Steak – The ultimate showstopper with plenty of meat to work with.
✔ Porterhouse & T-Bone – A mix of tenderloin and strip steak, ideal for slow cooking.
Pro Tip: The best Reverse Sear Steak are at least 1.5 inches thick. If your steak is too thin, it will cook too quickly and won’t develop the same edge-to-edge doneness.
❌ Cuts to Avoid
🚫 Flank Steak & Skirt Steak – Too thin and best cooked quickly over high heat.
🚫 Minute Steak – Cooks too fast for the reverse sear method.
If you’re unsure which steak to choose, go for a well-marbled ribeye—it’s a classic for a reason.
Step-by-Step Guide to Reverse Sear Steak
Now that we know why reverse searing is amazing, let’s break down exactly how to do it at home.
Step 1: Preparing the Steak – Choosing, Dry Brining & Seasoning
The secret to an incredible steak starts before it even hits the heat.
1️⃣ Choose a High-Quality Cut
If possible, go for grass-fed, dry-aged, or USDA Prime beef for the best flavor and texture.
2️⃣ Dry Brine for Maximum Flavor
Dry brining (salting the steak in advance) enhances tenderness and seasoning. Simply:
✔ Sprinkle salt generously over both sides of the steak.
✔ Let it sit uncovered in the fridge for at least 45 minutes (or overnight for deeper flavor).
This draws out moisture, which then reabsorbs back into the meat, making it even juicier and more flavorful.
3️⃣ Season to Your Taste
Beyond salt, you can add:
✔ Freshly cracked black pepper – Classic, bold, and enhances the crust.
✔ Garlic powder – Adds a subtle umami kick.
✔ Paprika – A touch of smoky sweetness.
Avoid adding sugar-heavy rubs early on—they can burn during searing.
Step 2: Setting Up Your Oven or Grill for Low and Slow Cooking
Reverse searing starts low and slow. Here’s how to set up your cooking station:
🔹 Oven Method:
✔ Preheat to 225°F (107°C).
✔ Place the steak on a wire rack over a baking sheet—this allows for even airflow.
🔹 Grill Method:
✔ Set up for indirect heat at 225°F.
✔ Place the steak on the cool side of the grill, away from direct flames.
Why low heat? Cooking at a gentle temperature ensures even doneness and prevents overcooking.
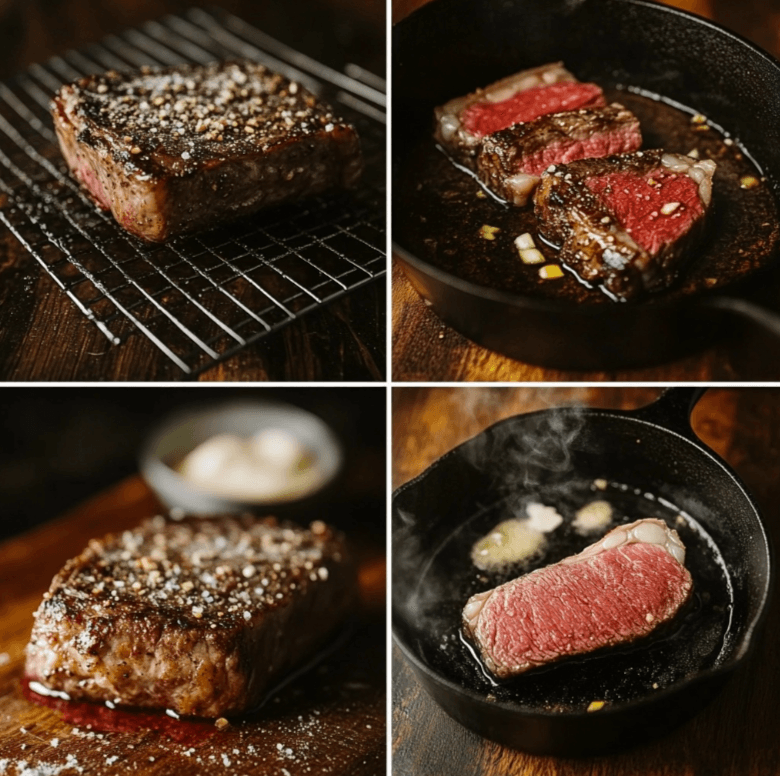
Step 3: Cooking the Reverse Sear Steak at a Low Temperature
Once the oven or grill is ready:
✔ Insert a meat thermometer into the thickest part of the steak.
✔ Cook until the internal temperature reaches 10-15°F below your desired doneness (e.g., 115°F for medium-rare).
This part takes patience—but trust me, it’s worth it!
Reverse Sear Steak Temperature Guide
Getting the perfect steak doneness is all about precision, and that’s where the reverse sear method shines. By controlling the internal temperature and cooking the steak low and slow, you can nail the perfect doneness every time.
Rare (120-125°F)
If you love your steak cool and red inside, aim for rare doneness. The texture will be very soft and tender, with a melt-in-your-mouth feel.
✔ Pull from oven at: 110-115°F
✔ Final temp after searing: 120-125°F
Best cuts for rare: Filet mignon, ribeye
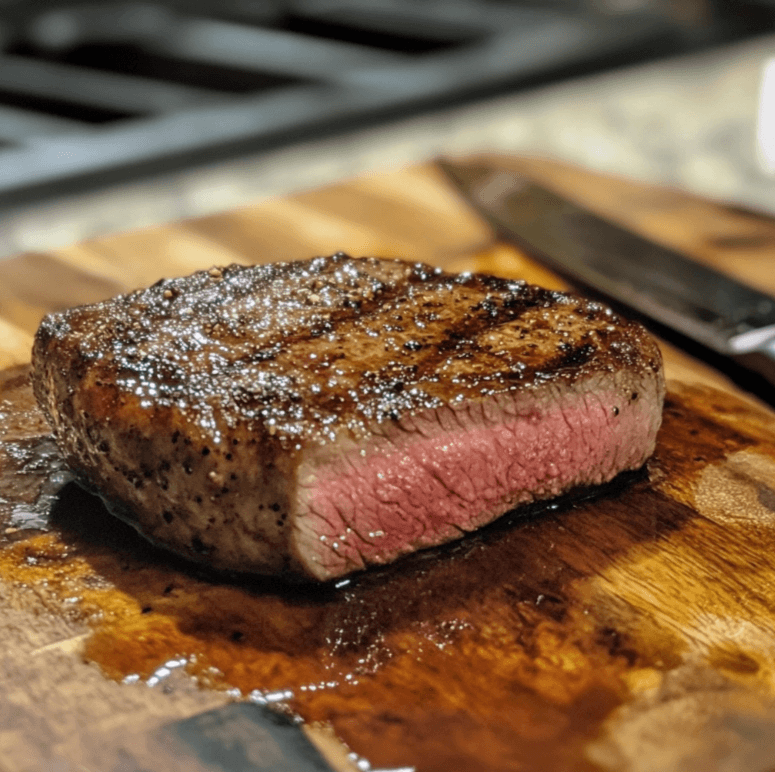
Medium Rare (130-135°F)
This is the gold standard for most steak lovers! Medium-rare gives you a warm, red center with a perfectly tender and juicy texture.
✔ Pull from oven at: 120-125°F
✔ Final temp after searing: 130-135°F
Best cuts for medium rare: Ribeye, New York strip, porterhouse
Medium (140-145°F)
If you prefer a slight pink center with a firmer bite, medium is your best bet. You still get some juiciness, but with a more well-done edge.
✔ Pull from oven at: 130-135°F
✔ Final temp after searing: 140-145°F
Best cuts for medium: T-bone, tomahawk
Medium Well (150-155°F)
Steaks at medium well have only a hint of pink inside and are firmer in texture. While still flavorful, they lose some juiciness.
✔ Pull from oven at: 140-145°F
✔ Final temp after searing: 150-155°F
Best cuts for medium well: New York strip, filet mignon
Well Done (160°F and above)
For those who prefer zero pink, well-done steaks are fully cooked through. However, they risk being tough and dry if not handled properly.
✔ Pull from oven at: 150°F
✔ Final temp after searing: 160°F+
Best cuts for well done: Thick-cut filet mignon (to prevent excessive dryness)
Common Problems & Solutions in Reverse Searing
Even though reverse searing is one of the most foolproof methods, mistakes can still happen. Here are some common issues and how to fix them.
Reverse Sear Steak Turns Out Too Dry – How to Prevent Overcooking
❌ Problem: Your steak lost too much moisture and became dry.
✅ Solution: Always pull the steak from the oven 10-15°F before your target temperature since it will continue cooking when seared.
Not Getting a Good Sear – Fixing a Weak Crust
❌ Problem: Your steak doesn’t develop that crispy, golden-brown crust.
✅ Solution: Make sure to:
✔ Pat the steak completely dry before searing.
✔ Use a smoking-hot cast iron skillet.
✔ Don’t overcrowd the pan—sear one steak at a time.
✔ Use high-smoke point oils like avocado oil or beef tallow.
Reverse Sear Steak is Tough – How to Choose the Right Cut
❌ Problem: Your steak turned out chewy and tough instead of tender.
✅ Solution:
✔ Use thicker, well-marbled cuts like ribeye, filet mignon, or porterhouse.
✔ Avoid lean or thin steaks like flank steak or sirloin.
Takes Too Long to Cook – Speeding Up the Process
❌ Problem: Your steak took forever to reach temperature.
✅ Solution:
✔ Don’t cook at too low of a temperature—225°F (107°C) is ideal.
✔ Use a wire rack to improve airflow around the steak.
✔ Let the steak come to room temperature before cooking.
Pro Tip: Always invest in a quality meat thermometer—this eliminates guesswork and helps you achieve perfect doneness every time.
Best Seasoning and Marinades for Reverse Sear Steak
While a good-quality steak needs nothing more than salt and pepper, the right seasonings and marinades can take it to the next level.
Classic Salt & Pepper Seasoning
Sometimes, simple is best. A generous coating of kosher salt and freshly cracked black pepper is all you need to enhance the natural beefy flavor of a high-quality steak.
✔ Salt your steak early (dry brining for at least 45 minutes is ideal).
✔ Use coarse salt—fine salt dissolves too quickly.
✔ Crush fresh peppercorns instead of using pre-ground pepper for bolder flavor.
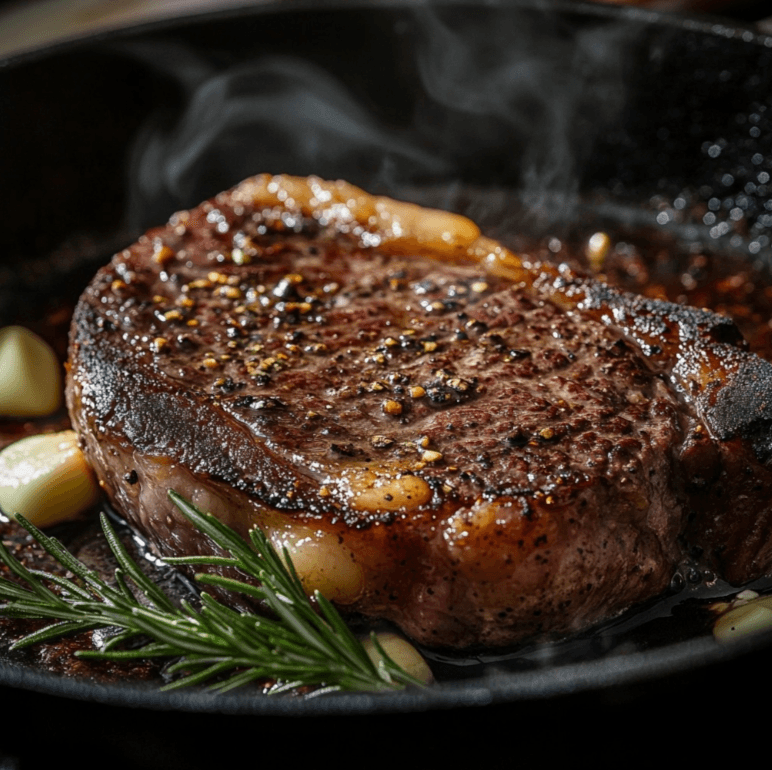
Garlic Butter Basting for Extra Flavor
Want to add richness and aroma? Try butter basting during the final searing step.
🥄 Ingredients:
- 2 tbsp butter
- 2 cloves garlic (crushed)
- 1 sprig rosemary or thyme
🔥 How to Do It:
1️⃣ During the last 30 seconds of searing, add butter, garlic, and rosemary to the pan.
2️⃣ Tilt the pan slightly and spoon the melted butter over the steak repeatedly.
3️⃣ This infuses deep, nutty flavors into the crust.
Herb-Infused Seasoning for a Gourmet Touch
For a flavor-packed steak, mix in herbs and spices:
✔ Paprika – Adds a smoky, slightly sweet flavor.
✔ Garlic & Onion Powder – Boosts umami.
✔ Chili Flakes – A little heat goes a long way.
✔ Thyme & Rosemary – Adds earthy depth.
Dry Rub vs. Marinade – Which Works Best?
❌ Avoid marinades with high sugar content—they can burn during searing.
✔ Use dry rubs for stronger crust development.
✔ If marinating, opt for oil-based marinades with herbs and citrus.
Pro Tip: If using a dry rub, let it sit on the steak for at least an hour before cooking to maximize flavor absorption.
Reverse Sear Steak vs. Sous Vide – Which Method is Better?
Reverse searing and sous vide are two of the most precise cooking techniques for achieving restaurant-quality steaks. But which one is better? Let’s break it down.
Cooking Time & Convenience
| Factor | Reverse Sear | Sous Vide |
|---|---|---|
| Cooking Time | 45-90 minutes | 1-4 hours |
| Equipment Needed | Oven, skillet, thermometer | Sous vide machine, vacuum sealer, water bath |
| Ease of Use | Beginner-friendly | Requires extra tools |
| Texture | Crispy crust, tender inside | Super tender, less crust unless seared |
💡 Want a crispy, herb-infused crust on other proteins? Our parmesan-crusted chicken recipe offers a similar flavor-packed experience with a crunchy, cheesy coating
Reverse searing requires fewer tools and is easier to set up, while sous vide is more hands-off but takes longer.
Flavor and Texture Comparison
✔ Reverse Sear: Gives a bold, smoky, and crispy crust while keeping the inside tender. Ideal for those who love a steakhouse-style bite.
✔ Sous Vide: Produces a melt-in-your-mouth texture with precise doneness. However, it requires an extra step for a strong crust.
Equipment Needed – Oven vs. Sous Vide Circulator
Reverse searing only requires an oven, a cast iron skillet, and a thermometer, making it more accessible.
Sous vide requires a special water circulator, vacuum sealer, and a water bath setup, which adds to the cost and complexity.
Final Verdict: If you love a crispy crust with minimal equipment, go for reverse searing. If you prefer a precise, ultra-tender steak, sous vide might be better for you.
💡 If you prefer grilling, consider trying our grilled chicken on the Barbie for a flame-kissed, smoky flavor that works just as well as the reverse sear method.
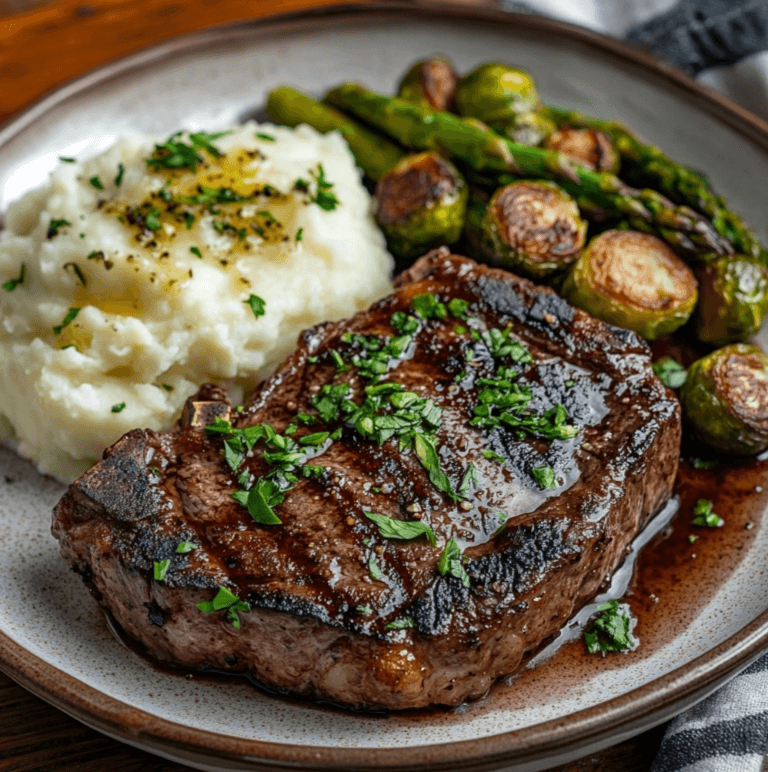
Best Sides to Serve with Reverse Sear Steak
A perfect steak deserves amazing side dishes! Whether you’re serving a romantic dinner or a weekend feast, these side options complement the rich flavors of the Reverse Sear Steak.
Classic Mashed Potatoes 🥔
Creamy, buttery, and the perfect contrast to the crispy crust of a reverse-seared steak.
Ingredients:
✔ 4 large russet potatoes
✔ ½ cup heavy cream
✔ 4 tbsp butter
✔ Salt & pepper to taste
Pro Tip: Add roasted garlic or parmesan cheese for extra depth of flavor.
Garlic Butter Asparagus
Crisp, flavorful, and super easy to make. The slight bitterness of asparagus balances the richness of the reverse sear steak.
How to Make It:
✔ Sauté asparagus in butter and minced garlic for 5 minutes.
✔ Finish with a squeeze of lemon juice for freshness.
Roasted Brussels Sprouts
Brussels sprouts caramelize beautifully, adding a nutty, slightly sweet flavor that pairs well with ribeye and filet mignon.
✔ Toss sprouts with olive oil, salt, and balsamic glaze before roasting at 400°F for 25 minutes.
Creamed Spinach
A steakhouse favorite! Rich, creamy, and full of cheesy goodness.
✔ Sauté spinach with butter, cream, garlic, and parmesan for a decadent side dish.
Red Wine Mushroom Sauce 🍷
For an elevated steak dinner, drizzle your reverse-seared steak with a rich mushroom and red wine sauce.
✔ Sauté mushrooms in butter, shallots, and garlic.
✔ Deglaze with red wine and reduce until thickened.
Pairing Tip: A bold Cabernet Sauvignon or Malbec goes perfectly with reverse-seared steak. 🍷
💡 Looking for a crispy, buttery alternative? Try these garlic butter smashed potatoes, the perfect complement to a juicy reverse-seared steak
Essential Tools for Perfect Reverse Sear Steak
Having the right tools can make a huge difference in precision, ease, and overall steak quality.
Meat Thermometer – Why Accuracy Matters
A high-quality digital meat thermometer is non-negotiable for reverse searing.
✔ Ensures you hit the perfect temperature every time.
✔ Eliminates guesswork and prevents overcooking.
✔ Recommended: Thermapen or MEATER+ (wireless).
Cast Iron Skillet vs. Stainless Steel for Searing
✔ Cast Iron Skillet – Retains high heat for an even, crispy crust.
✔ Stainless Steel Pan – Works well, but not as heat-retentive as cast iron.
Pro Tip: Avoid non-stick pans—they don’t get hot enough for proper searing.
Oven vs. Grill – Which Works Better?
✔ Oven: More consistent temperature, great for home kitchens.
✔ Grill: Adds a smoky, charred flavor, perfect for outdoor cooking.
Pro Tip: If using a grill, set up indirect heat for the slow-cooking phase, then high direct heat for the sear.
Choosing the Right Oil for High-Heat Searing
Not all oils can handle extreme heat. Stick with:
✔ Avocado Oil (520°F smoke point)
✔ Beef Tallow (400°F, adds flavor)
✔ Ghee (480°F, buttery taste)
Avoid butter or olive oil alone—they burn at high temperatures.
Expert Tips for the Best Reverse Sear Steak
Want to take your steak to the next level? These expert tips will ensure you get steakhouse-quality results every time.
Why Dry Brining Overnight Makes a Huge Difference
✔ Sprinkling kosher salt on your steak at least 12 hours before cooking enhances both flavor and texture.
✔ The salt draws out moisture, which is reabsorbed into the meat, making it juicier and more flavorful.
Pro Tip: Always dry brine uncovered in the fridge for maximum impact.
Resting the Steak Before Searing – A Pro Chef’s Trick
✔ Let the steak rest for 10-15 minutes after coming out of the oven before searing.
✔ This prevents excess juice loss and helps maintain the perfect crust.
Using a Wire Rack for Even Cooking
✔ A wire rack allows air to circulate around the steak, preventing uneven cooking.
✔ Avoid placing the steak directly on a baking sheet—it can cause the bottom to cook faster.
The Secret to the Perfect Crust – High Heat & Butter Basting
✔ Preheat your pan for at least 5 minutes until it’s smoking hot.
✔ Sear with high-smoke-point oil for a crispier crust.
✔ Finish with butter, garlic, and thyme basting for extra flavor.
Final Tip: The best way to serve reverse seared steak is with a sprinkle of flaky sea salt and a drizzle of garlic butter.
Final Thoughts: Why You Should Try Reverse Searing Today
Reverse searing is hands-down the best way to cook a steak at home. It gives you:
✅ Precise doneness with zero guesswork
✅ A beautifully even pink center from edge to edge
✅ The crispiest, most flavorful crust
✅ A juicy, tender bite every time
So, if you want to impress your guests, treat yourself, or master steak cooking, reverse searing is the method to try! 🥩
🔥 If you love slow-cooked meats, you might also enjoy our slow cooker beef ragu, which delivers rich, deep flavors just like a well-executed reverse sear steak.
FAQs About Reverse Sear Steak
Can I Reverse Sear a Frozen Steak?
Yes! Just increase the cooking time in the oven by 30-40% before searing.
How Long Should I Let the Steak Rest?
At least 10-15 minutes after cooking for maximum juiciness.
Can I Reverse Sear on a Gas Grill?
Yes! Use indirect heat at 225°F, then finish with high direct heat for the sear.
🔥 Now it’s your turn—are you ready to cook the perfect steak? 🥩
🚀 After mastering steak, why not indulge in homemade desserts? Try our chocolate glazed donuts for a decadent treat!